CDN NEWS |
  US NEWS


 While we always imagine our signs and decals spending eternity together, it often just doesn’t work out that way. Sometimes it’s that the decal is weathered and worn faster than the sign, or sometimes the information on the decal just needs to be updated. Whatever the reason, there are times when a perfectly good sign has a decal that just isn’t right for it anymore. Instead of tossing the whole thing, putting a new decal on an existing sign just makes more sense.
REMOVING DECALS
The first step to putting a new decal on an existing sign is to remove the old decal and any remaining adhesive. The difficulty and recommended method of doing this can change depending on the age and the deterioration of the current decal.
REMOVING NEWER, FULLY INTACT DECALS
In situations where you are replacing a decal that is newer and fully intact, it is likely that you will be able to remove the decal in larger pieces. In this situation you would likely be able to use a chisel or exacto knife to lift a corner or edge of the decal and then pull on the decal to remove it. If possible, you should apply heat to the opposite side of the sign to help loosen the adhesive, making it easier to pull the decal from the sign.
Pro tip: You’ll have more success removing a decal if you are patient and work slowly. While it might be tempting to give a good yank once you make some progress, that’ll likely cause the decal to rip and set you back. Slow and steady definitely wins this race.
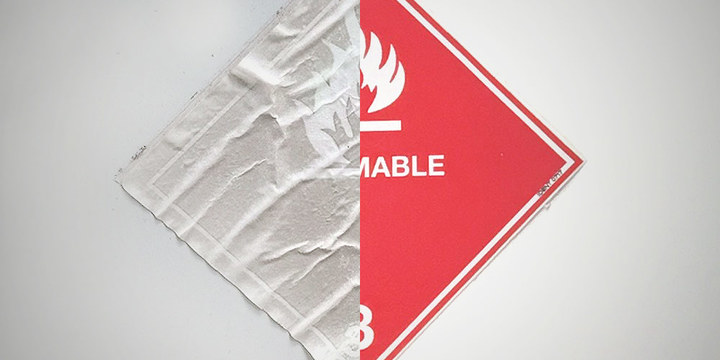
REMOVING OLDER, WEATHERED, AND CRACKED DECALS
If the decal you’re trying to remove is old, weathered, and cracked things aren’t quite so straightforward. Trying to peel an edge and pull the decal off will more likely result in you grabbing a handful of your own hair and pulling that instead. In this situation you may want to opt for either a vinyl-removing product such as Vinyl Off or just skip straight to power tools.
Vinyl-Removing Products
Vinyl-removing products such as EZ Strip work help loosen the adhesive keeping the vinyl attached to the sign. You simply spray on the product, let it work its magic, and then peel, pull, or scrape the vinyl from the side. One benefit of using this type of product is that it helps remove a lot of the residual adhesive, making the second step of the process much shorter and easier. While these products are typically safe to use on metal, we recommend that you test on a small, inconspicuous area before putting it all over your sign.
Power Tools
If all else fails, reach for the power tools. Stripe Eliminator is an inexpensive urethane rubber wheel that attaches to a drill and can remove vinyl decals without burning or discolouring the material beneath. If you feel like making more of an investment you could purchase a tool specifically designed for vinyl removal and surface refinishing such as the MBX Vinyl Zapper, but if this isn’t something you find yourself doing often that’s probably unnecessary. These products are commonly used for removing decals from cars, so they should be fine to use safely on your sign, but we recommend you test a small area to make sure you have a grasp on how these tools work before getting carried away.

REMOVING RESIDUAL ADHESIVE
Before you can put a new decal on your old sign you need to make sure that all of the residual adhesive, from your previous decal has been removed and your surface has been thoroughly cleaned. There are plenty of products made specifically for removing adhesives and most of them work very well. If you’re looking for something easily accessible to help get the job done, you can use rubbing alcohol, or if you’re working outside or in a well-ventilated space you can even use gasoline.
APPLYING YOUR NEW DECAL
Now that your old decal has been removed and your sign has been cleaned of all residual adhesive, dirt, or anything else that might have been on there, it’s time to apply your brand new decal. We’ve broken down the process into a few easy steps for you:
1. Line your decal up with the exact location you want to place it on your sign.
2. Lift a small portion of your decal from the paper backing. If you’re having trouble you can use an exacto knife to help gently lift the decal.
3. Adhesive side down, carefully place the lifted piece of the decal onto the sign. Make sure that it is exactly where it needs to be!
4. Slowly remove the backing from your decal, closely following along with a squeegee or other straight edge to avoid air pockets or bumps.
5. Repeat the process for all of the decals that need to be placed on your sign.
Fun fact: high quality, well-made signs sometimes outlive even the best vinyl decals. Not only is opting to replace the decal an inexpensive way to get more out of your investment in quality, but it also means less waste. If you have any questions about whether you should replace your whole sign or if a decal replacement would be sufficient, get in touch! Our team is always here to help you figure out what will work best for you.
Still feeling stuck? Regardless of the location you’ll be placing your tag, we’ve got a material that will work in both terms of practicality and functionality. Don’t hesitate to get in touch if you need a recommendation, or if you would like to place an order! identsigns.com/contact
Share This: